How To Code a Button Into an Image Text Block In Mailchimp
There are some things that the Classic Builder in Mailchimp cannot do and this is one of them. When you use the Drag N Drop Builder to pull in an “Image + Text” block, there is no option to have a clickable button within that same block.
Well, this little html code does the trick. What’s cool is that you can edit the HEX code in here to create the exact type of button you’d like.
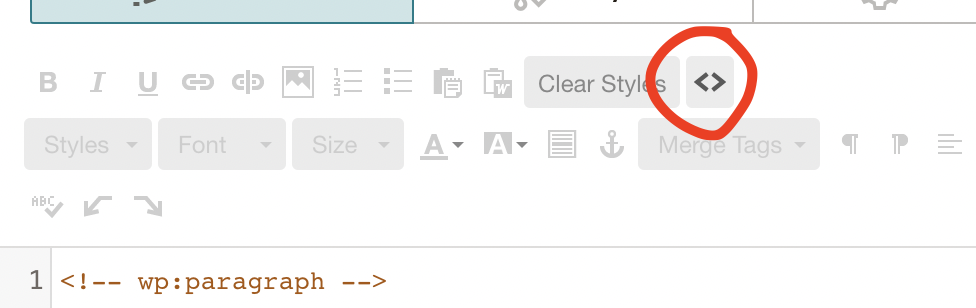
First, when you’re in your text block, you will want to click this button <> and paste the code Into this.
You should plan to edit the coding some below to whatever you need for your button. Make sure you update the link in the coding below to your own link and you can also change the “Learn More” text too.
Simply copy and paste this coding below into your text block:
Small businesses often have a limited number of resources available to them compared to large corporations. With smaller marketing budgets, small businesses must learn how to utilize every tool available to them. Mailchimp is one of the tools that small businesses can take advantage of to help boost their email marketing strategies.
But what are all the benefits of Mailchimp? 9 experts have shared their best practices when it comes to using Mailchimp for their businesses.
Use One Master Audience
I’ve completed a lot of audits for Mailchimp users. The number one best practice I’d recommend is to have only one master list, or audience, in a Mailchimp account. Most accounts I see may have 2, 5, or even 25 audiences! Instead, form one audience and use tags and segments to organize and target your contacts.
Small businesses should know about the variety of services Mailchimp offers besides automated messaging. Mailchimp offers website hosting services that could elevate a business’s online presence. Having a solid and visible presence on several online platforms increases your chances of converting impressions into sales – as long as you utilize them.
I always recommend putting your business owner’s name in the “sent from” field. For example: Anna from Caldwell Media Arts, is likely to have a higher open rate than Caldwell Media Arts on its own. This is a strategy that works well for many small businesses who already rely on that personal touch from their founder(s) as part of their brand capital.
Make the most of automated emails. When inboxes become flooded, emails with no value are the first in the trash. Make your messages valuable by utilizing welcome emails for new subscribers that describe what you offer, birthday discounts for those who provide their birthday information and new product or service notifications. Don’t just send an email to send an email. Make sure each message you send has a distinct purpose with a clear call to action rather than several messages saying the same thing over and over again.
Subscribe to newsletters or updates from brands that you respect and admire. When you get them, set up a filter or file them in a folder for later so when it’s time to create your own content, you’re not reinventing the wheel or starting from scratch. This is also a really great way to get new ideas from industry experts. If you’re a small business, follow your competitors with big money who have an entire department crafting their emails. Austin Kleon wrote a great book on this theory called “Steal Like an Artist” – the secret is to do good work and make it your own. Even the greatest artists had inspiration in one form or another.
Small businesses looking to shave some time off of emailing should utilize Mailchimp’s existing templates. Sometimes professionals will advise against it because there are some customization restrictions, but when you are first starting out, it is a lifesaver! The website features over 100 choices for emails and newsletters and it helps save the time and effort it would take to create/ code your own templates.
If you have large email lists, segregate your audience in groups that make sense for your business. Not every subscriber will be interested in every piece of content you share. By tailoring campaigns by subject matter, geographic location and other preferences, you’ll reduce the amount of people that unsubscribe and increase open and click rates. It takes more time, but each campaign you send will have much higher engagement rates.
One Mailchimp best practice that small businesses should know about is regularly pruning your email lists. If people don’t engage with or even open your emails, there’s no reason for them to be there. Not only are you paying for them to stay on your list, but their inactivity could negatively impact your deliverability with people who want to receive your emails. My rule of thumb is to automatically delete anyone who hasn’t opened my last twenty emails.
Tag your contacts! All of them. Find categories of content you like sharing, and then bucket those out among your tags. No one needs to receive all of your content, and breaking it up this way ensures you get the right message to the right folks. Contacts can have multiple tags too – embrace tagging!
DID YOU KNOW that Cyber Monday was the biggest online sales day of the year in 2018? In case ya didn’t know, this is probably the busiest week of the year for us email marketers, so I thought I’d give you a few important Cyber Monday email tips here. And also – I just love this photo.
1. Send your Cyber Monday email when others AREN’T. Don’t follow the crowd. Send the day before or even the day after. Or send it today! I’m sure you’ve already seen quite a few Black Friday emails. You should also use Mailchimp’s “send time optimization” tool to determine the best send time for your particular Audience.
2. Urgency. Make sure you explain when the deal will end so people feel a sense of urgency to buy that day.
3. Don’t hesitate to send it late at night.One study I read shows 11pm had a high click rate (I know I shop online late at night…)
4. Keep it short and sweet. Your email should include your deal, a big image of your product, coupon code and a button to buy it. Remove any extra fluff.
5. Use GIFs or moving images in your email to keep it fun and interesting. Check out this gorgeous email from Kidly.
6. Keep subject lines short (under 30 characters) and use emojis. Think fun and light.
7. Make sure you have an Abandoned Cart email setup and ready. This is a huge opportunity to increase your sales.
8. Use all channels. Consider creating a Facebook Ad or a landing page for your Cyber Monday deal. Promote on social. This will make you way more competitive.
9. Send your email a second time! Consider sending an “EXTENDED” email after Cyber Monday saying the sale has been extended.
Happy Online Shopping Season! I’ll be over here getting our client’s emails ready and tested.
(Photo via @fashionsfromhistory on Instagram)
If you have an Apple computer, chances are you use “Finder” all day, every day. And chances are you don’t know half of the little things that this smart little file organizer can do. Finder for Mac OS X is basically everything. It IS your computer. No, really…it is. And there are a lot of hidden features that you shouldn’t be expected to know, but they’re definitely helpful!
While building my business over the last few months, I have started to zero in on a new little hobby — TEACHING people how to use the online tools I know and love. Online Tutorials! I have found that I love helping people figure things out on the ‘nets — seeing their online lightbulb go off and hearing “wow, I didn’t know that!”
So while doing a few online tutorial screen share sessions lately, I’ve discovered that people don’t use the “Finder” to its fullest. Here are some of my favorite little tips for you and your Finder! Sorry Windows users…
COLOR TAGS! Use them, name them, love them!
I love nothing more than color-coding my life and especially on the Finder, when everything is well…silver. In FINDER, you can set different colors for different things. For me, RED means “Important,” YELLOW means “blog photo,” BLUE means “delete later,” etc.
You can set up your Finder Color Tags by:
Under Finder > “Preferences” > Tags
Clicking on word “Finder” in the very, very top left.
Clicking “Preferences.”
Click “Tags.”
Double click on the word “Yellow” and change the name. Add colors for Home and Work. Add new categories using the + or – and more.
To actually use the color tags on files, simply “right-click” on any file or folder in Finder and select the color (If you haven’t setup the ability to “right-click,” do that asap in your System Preferences > Mouse > Secondary Click ). I usually only give it a color if it’s something important I need to remember or want to easily find.
You can also drag any “color tag” over to your sidebar so you can easily click on say all the “Yellow” Finder items.
And highlight a bunch of files and change them to a color all at once. Click the mouse and hold SHIFT and scroll down the files you want. Then right-click and find color!
2. DRAG ANY FOLDER TO YOUR SIDEBAR.
Have an important folder that you come back to or use daily? Put it on your sidebar for easy access! This does not remove or delete the folder…it simply puts a shortcut to it on your sidebar. Super handy. I have a big “WORK” folder which I access daily. I love it on my sidebar.
My “WORK” folder dragged over to the sidebar.
3. VIEW THINGS DIFFERENTLY.
The four Finder view options – get to know them!
People tend to get stuck in their Finder viewing ways. Some people love the thumbnail or “icon view” and some love “list view.” I am a “list view” kind of girl on some days and other days, I need to see things differently. Switch up the views to see what works best for you. There are 4 options – from left to right — icon view, list view, column view (great for dragging files to different places) and “Cover Flow” view. I tend to only use the first 3 (Cover Flow is a bit much!), but explore each one and see what you love.
List View looks like this!
Icon View or Thumbnail View looks like this!
4. “SHOW VIEW OPTIONS” – i.e., the little flower wheel button!
If you’re in the Finder window, click on the little circle/flower/wheel button for some additional fun settings. Highly recommend looking at “Show View Options.” Here you can change the text size for your files, icon size, how you want them to automatically be sorted (I love Date Modified for everything!) and more. Customize, customize!
Click the Settings wheel in Finder window and click “Show View Options”
5. PUT A BUNCH OF FILES INTO A FOLDER IN A JIFF!
You can highlight a load of files (using click + SHIFT + click) and then RIGHT CLICK and select the “New folder with Selection (9 items)” button to put a big group of files into a single folder all at once. I am all about folders. EVERYTHING should have a folder. This makes it fast if you have a lot of files that go together.
6. SEARCH, SEARCH, SEARCH!
The thing is — it’s called FINDER for a reason! The “search” within Finder is amazing. You can search anything on your entire Mac. Or just in this folder. Can’t find something? Think of a word and just search for it. Then simply organize the view by Date Modified or By NAME and I bet you’ll find it.
Have something you want to learn how to do online? Excel? Dropbox? Finder? MailChimp? Illustrator 101? Shoot me an email here, give me one hour and we can do this!

 DID YOU KNOW that Cyber Monday
  )
)


